 Here's a photo of a clematis growing in my garden. The leaves overlap each other and are casting shadows downwards. In this demo I'm trying to portray this effect.
I think this negative painting effect is born of working from photographs a lot. It aims for realism and has little to do with conceptual art or spontaneous expression and as such wont be everyone's cup of tea! I'm trying to capture a realistic sense of depth and 3D. So that, like in a photograph, you feel as if you are travelling into the painting.
Many people find this concept of painting back to front difficult to grasp. So if this is the case perhaps having a go at this demo stage by stage will make the difference.
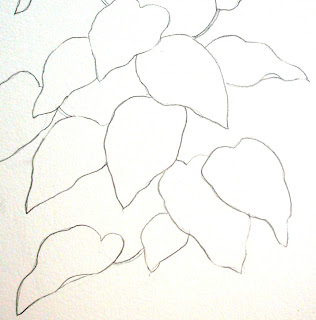
 First I made an outline drawing of leaves overlapping each other. These might be clematis leaves.
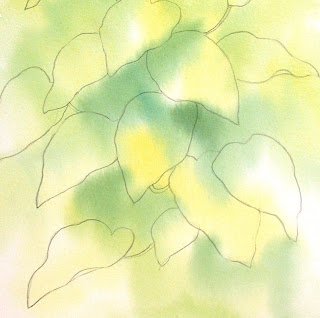
 In this first stage of painting I laid a wet in wet wash. I had mixed up some yellow and some blue separately in my palette and also mixed a green by combining the yellow and blue. I wetted the whole of the paper and the dropped in yellows and greens wet in wet. I made sure the yellows went over the uppermost leaves and the darker greens went into the areas between the leaves. This started the 3D effect straight away as the yellows stand out and the greens recede. I ignored the pencil lines at this stage, just wanting to get a general effect to start with.
I let this dry completely. It 's important to allow each stage to dry completely...you can use a hair dryer!
Before painting here, you see I have drawn in some stalks in the middle depths as a guide for my painting. With a darker green (with more blue mixed in with the yellow) I painted AROUND just the uppermost leaves. Where one leaf overlaps another, I brought the darker paint underneath the top leaf to make it seem as though a shadow was being cast on the lower leaf. You can see I have painted over the underneath stalks and leaves at this stage. I let this dry completely.
Then with an even darker green I painted AROUND the underneath leaves which as a result were now standing out but were darker in tone than the very top leaves. At the same time I used this darker green mix to paint each side of the leaf stalks and tendrils that I had drawn in the middle depths, thus making another layer of depth. Once again I let this dry.
Finally I painted in some more veins on the leaves which introduces depth and form within the leaves. So the leaves themselves become 3D. I deepened the shadows cast by the overlapping leaves by going over with a fairly watery bluey green. And I was pleased with my 3D effect!
And finally here's this 3D technique used in one of my paintings. This shows a section of a clematis painting where I have used the negative painting method to portray the leaves.


Oh it is wonderful! Thank you for sharing this.
ReplyDeleteHi Maria! Your comment is my first feedback on this techniques blog. Hope this was useful to you. Would love you to be a follower!
DeleteAnn
AM SANDRA FROM CANADA, THANKS TO DR ONIHA WHO HELP ME BRING MY HUSBAND BACK, MY HUSBAND LEFT ME WITH THREE KIDS, FOR ANOTHER YOUNG GIRL, FOR OVER TWO YEARS, I TRIED ALL I COULD TO SETTLED OUR DIFFRENCES, BUT IT YIELDED NO RESULT, I WAS THE ONE TAKING CARE OF THE CHILDREN ALONE, UNTIL ONE DAY, I CAME IN CONTACT WITH SOME ARTICLES ONLINE, CONTAINING HOW DR ONIHA HAS HELP SO MANY LOVERS AND FAMILY REUNION AND REUNIT AGAIN, AND I DECIDED TO CONTACT HIM, AND HE CAST HIS SPELL ON MY HUSBAND, WITHIN FIVE DAYS, MY HUSBAND RAN BACK HOME, AND WAS BEGGING ME AND THE KIDS FOR FORGIVENESS, IN CASE YOU ARE PASSING THROUGH SIMILAR PROBLEMS, AND YOU WANTS TO CONTACT DR ONIHA, YOU CAN REACH HIM VIA HIS CONTACT NUMBER, ON CALL OR WHATSAP +2347089275769 OR EMAIL DRONIHASPELL@YAHOO.COM
DeleteThank you Ann, this is exactly what I need to improve my painting techniques!!!! I wish I lived closer...I would come for private lessons LOL!!!
ReplyDeleteChris :o)
Thanks Chris...hope there will be lots of things to interest you. Thanks for calling in!
ReplyDeleteAnn
Thanx Anne I have tried this and am quite pleased with the outcome. This blog is a great idea
ReplyDeleteThat's brilliant Jenny, so pleased its been useful!
ReplyDeleteWould love you to be a follower.
Ann
Hi, I'm going to try this technique on the round rosette
ReplyDeleteI think it is called, that encircles the base (at the ceiling) of my dining room chandelier. The rosette is molded 3d type with roses and leaves, but I needed the shading to be right to capture and emphasize the flowers up there. Wish I had time to do this before it went up ten yrs ago. Figuring on using sponge paint applicators and brushes. Neck wont take too much of this.
Thank you great ideas. Love the purple clematis.
I'm just a beginner. This tutorial was very helpful!
ReplyDeleteThank you,
Diane
Painting negative spaces always has a great effect, plus it is so much fun. I've never tried dropping color in wet before, but I will now. Thanks.
ReplyDeleteDid you pour the colors for the clematis blossom?
ReplyDeleteHi Laura the clematis was from a different painting that I put here as an example of the technique used in an actual painting. I don't know what you mean by "pour" but the flower was there right from the beginning of that painting. It wasnt added at the end. Hope that answers your question,
ReplyDeleteLovely florals that are just exquisite!
ReplyDeleteExcellent explanation and step by step description. Many thanks for the clarity of explanation and quality of painting.
ReplyDeleteAdorei as suas pinturas. Bem gostaria de ir as suas aulas mas eu vivo noutro continenten. Obrigada . Fernanda
ReplyDeleteThis is truly amazing! Thanks so much for the lesson. It makes it so much easier to understand a technique when there are pictures or examples to go along with the explanation!
ReplyDeletevraiment magnifique!
ReplyDeleteThanks for sharing this lesson with watercolour lovers!!!
ReplyDeleteHi Ann!Love your paintings and the step by step demo.
ReplyDeleteI am passionate about watercolours and would simply love to attend your classes!I live in Hyderabad,India!!!!
Hi Anne, just found your blog and demo. It is fabulous. Thanks for sharing. We all learn so much from each other.Jane ( Palos Verdes, Ca)
ReplyDeleteHi Anne, just found your blog and want to work my way through it. Your descriptions of how you did things are excellent and I love your paintings so much. Thank you for sharing. You are very generous.
ReplyDeleteThanks Jennifer. Nice to hear from you and thanks for your appreciation!
DeleteAnne, your paintings are ever so beautiful. Thank you for sharing your expertise. Love browsing thru your website.
ReplyDeleteHola !!! Gracias Gracias!!! Estaba buscando esta técnica y recien me entero que se llam,a " en negativo" .
ReplyDeleteGracias y ya tienes una seguidora desde Uruguay !!
I love negative painting and haven’t for a while. Your lovely tutorial is the perfect refresher for me and inspires me get going again. Your paintings are exquisite, thank you !
ReplyDeleteI really love the arts/design of your website. I am so thrilled I found your website, I really found you by mistake, while I was browsing on Yahoo for something I found another one Sneha arts like you, Anyhow I am here now and would just like to say thanks a lot for a tremendous post blog and check these Sneha studio , also look like your website on arts.
ReplyDeleteBellisimas pinturas y gracias por tu forma de enseñar. Excelente maestra. Genia
ReplyDeleteThank you Ann
ReplyDeleteThat was super helpful. I have been trying without
ReplyDeleteknowing the proper technique and failed. But with your guidance I am confident I´ll be able to use this style on different pieces. Thank you !
I already gave up on ever getting cured of HSV2 because i have try many treatment none of them work out for me i have go to different hospital they always tell me same thing there is no cure for herpes when i came across a post about Dr Guba, in the net from a lady called Angela i contacted him and he reassured me with him herbal medicine which i took according to the way he instructed, that how i was cured. I doubted at first because I have been to a whole lot of reputable doctors, tried a lot of medicines but none was able to cure me. So I decided to listen to him and he commenced treatment, and within two weeks I was totally free from #Herpes. I want to say a very big thank you to DR GUBA for what he has done in my life. Feel free to leave him a message on email drgubahealingherbs@gmail.com or WhatsApp: +2347077581439 or website: https://drgubahealingherbs.wixsite.com/guba-healing-herbs,THESE ARE THE THINGS DR WATER IS
ReplyDelete