A little tip about using your colours today.
There are two ways of buying and storing your colours
In a box of ready made PANS as in a paintbox which you wet and work up with your brush
or
In TUBES, which you squeeze out and then mix with water.
My tip, even to someone completely new to watercolour, is to buy some tubes and an empty plastic palette with a lid and make up your own palette.
I have led many watercolour day workshops where very keen painters have had to spend half an hour or so finding their colours and sorting out a way of using them. This is valuable painting time lost!
Choose a few tube colours. You could even start with just three, a blue, (ultramarine), a red (alizarin crimson) and a yellow (raw sienna). Squeeze them into separate small sections of an empty plastic palette, leaving some empty sections in between. Then you have lovely juicy soft paint to work with and to start painting with straight away. With these three primary colours you can mix all the colours of the colour wheel.
When you can, add more colours. Perhaps a cool yellow such as aureolin, a cool blue such as Winsor blue, and a different red, such as burnt sienna.
This way you will gradually get to know your colours as you use them and not be confused with all the different names and hues.
It's important to always keep the colours topped up in the palette and leave them in the same position. Then you get to know the colours simply by where they are in the palette. And they will be ready to use as soon as you open the lid. No desperate searching around!
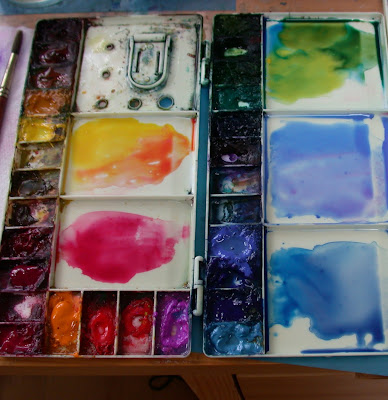
The photo above shows my palette. You can see that I've got the different hues, yellows, reds, blues, greens together in a sort of colour wheel. They are tube colours squeezed out into the small sections and I have got some colours ready in the big sections to use in a painting.
I've been using this palette for years and have collected the colours I use most in it. It took some time to do that. I keep topping up the colours and they stay moist, especially if I spray them with a small water spray before starting to paint.
People often get confused with the different blues...well if you have them together like this, you can see the difference between the warm flat cobalt blue and the cool brighter Winsor blue. You soon get to know them and this makes your choice of which blue to use so much more straightforward.
The tube colours...I use Winsor and Newton Artists...and the empty palette are available on line.
Enjoy setting up your palette!


 The rose petals were given form by painting them with a shadow mix wet in wet.


